Pink Wards
 - These things are so powerful and people don’t realize it. A permanent ward that reveals all wards surrounding it and anything else stealthed as well. It isn't invisible itself, but it takes five shots to kill. I try and keep at least one on me at all times, even if I have one out already.
Pink Wards can be used in a bunch of unconventional ways. Placing multiple in one area can force the enemy to stay and clear vision for a lengthy amount of time. Placing one in an area you
know the enemy will clear can bait them into death. If you’re intelligent with your placement too, you can get a lot of vision for a long time as well. Pink wards are going to be a special part of this article so we’ll cover that in more detail later.
Ward Placing
So getting wards is something decently simple to understand, but placing them is a whole other story. For a while now every summoner has been limited to three green wards on the map at one time and one pink ward. This is because in the older days, supports would generally get the burden of
all vision placement, and they were basically used as roaming vision bots that had some abilities.
Now you have to be smarter with your wards. Each one will cover an area for up to 3 minutes and if you ward the wrong area you’re going to assume you’re safe when in actuality you’re getting jumped on. This can be even more detrimental than not warding at all sometimes depending on your playstyle.
When you ward you’re trying to get vision in an area that is important for some reason. Sure getting that ward over by the enemy blue buff is great and will give you an awesome amount of vision, but how deep are you going into enemy territory to get that ward down? Is the enemy even going to pass by that ward realistically? Could they collapse on you easily? These are all things you need to think about
before you go to ward.
You can effectively ward defensively or offensively depending on the situation and it’s going to be different depending on what you need. You have to ask yourself, “Where do I need to see for either my team or myself to make smart and well-informed decisions. When you break it down to something simple like that it becomes a lot easier to ward.
Early Game
In the ultra-early game (I.E. before minions spawn), you might want to take a look at the enemy team and determine what the chances are for an early invade.
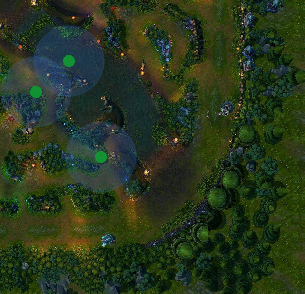
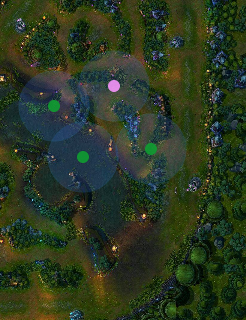
Blue Side
Here’s an example of how to handle an invade while on the blue side of the map. If the enemy has shown signs of trying to take your red buff, these are the places to ward. You’ll most likely only need to use your warding totem since it should last long enough to get you the info you need. If you know for sure that the enemy is coming you can place a ward on the red buff itself or in the bush to see them taking it.
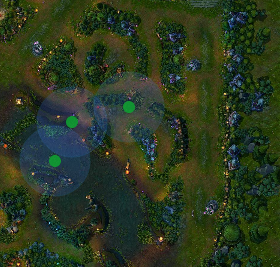
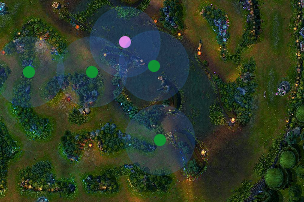
Red Side
And here’s the same view and three wards if you’re on red side. Defending and warding blue buff is a much different task than red buff. Blue has a much smaller area to cover around it and if the enemy is trying to sneak in, there’s only one way to do it. Otherwise they’re just going to brute force it through the dragon pit ramp. Once again, trinket should be all you need here
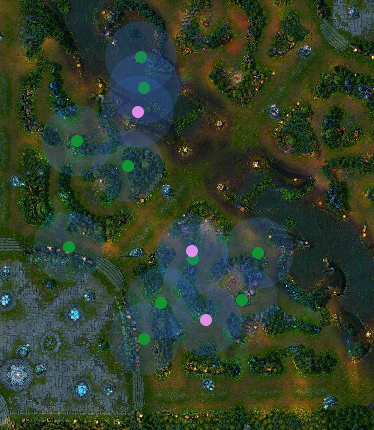
Once you get into laning, and even further on in the game, both sides ward about the same areas, but the reasoning for warding the areas is different depending on which side you’re on. What I mean by this is depending on your side the same ward could be offensive or defensive. Let’s look at bot lane vision from the view of a blue side support.
Blue Side
Basically you’re going to want vision of the bottom bushes at almost all points of the laning phase. Whether this is with a ward or with your own person can be dependent on the matchup and strength levels at the time. You’re going to want to keep an eye on supports like Leona or Blitzcrank so vision here is crucial against them. Usually a trinket ward can suffice here in order to use your three minute green ward for more crucial and protective areas such as dragon or gank paths.
The river wards are going to keep an eye on any jungler that would gank you early. Keep an eye on where the jungler starts (Usually indicated by whichever enemy lane shows up late) and assume that the first possible gank could occur around three minutes. This is a problem if the enemy jungler started opposite from you as you’ll need vision in the river to make it safe to move up past that time. Generally, the deeper ward in front of the dragon pit is the better ward since it gives vision of the enemy sooner, but the one in the river bush is a quicker dirtier ward that lets you get back into lane faster at the cost of deep vision. If the jungler started on the same side as you you can hold off on that ward a bit longer to have the vision and safety a bit later
The pink wards are for when you have an aggressive jungler who wants to try and make plays early. You’ll want to keep an eye out for when the enemy support puts a ward down and put the pink near that area. These are general spots I’ve listed that will usually get warded at some point. Having a pink in one of these areas gives your jungler the go ahead that they aren’t wasting time being seen if they try and gank your lane and can be great at giving you a nice lead if you can get the gank off.
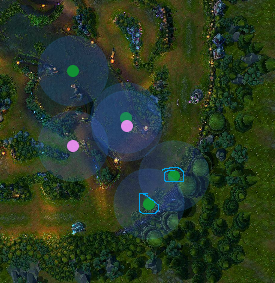
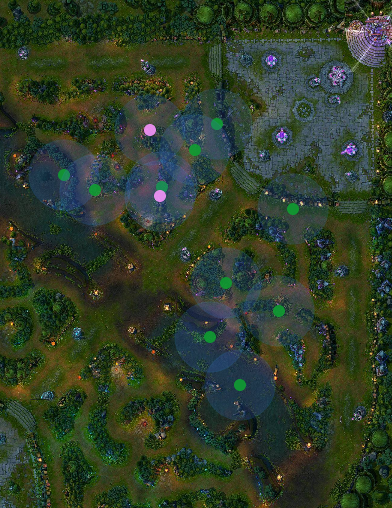
Red Side
Very similar thought process here. Bush wards we went over and the same with the dragon pit which, by the way, is a lot safer to reach from red side since you have access to the ramp. Warding dragon is less of a boon for you though on red side since most blue side junglers won’t be following that particular gank path so you should
only ward dragon if you’re worried about them taking it when on red side.
If you’re constantly pushing up to the enemy tower it’s incredibly important to keep that tribush warded since that’s by far the most common place you’ll see the jungler coming from. It’s really risky to stay pushed up if you’re not keeping vision there. If the enemy starts putting a pink ward in that bush and taking your vision, wait until you shove them into their tower again and call your ADC up to help you take the pink. The enemy ADC will be forced to focus on getting CS under tower and you’ll have a numbers advantage in taking the ward, since the enemy support is stuck trying to defend it by themselves.
The reason I don’t encourage pinking anywhere but that river bush is that there really isn't anywhere else you can defend a pink ward consistently. If you place it in the tribush and you get pushed back a little bit, you’re losing that one immediately. If you put it on dragon you’re leaving it out in the open. The bush vision goes back and forth so often that you can’t rely on that either. This pink can clear out a decent level of wards for your jungler.
The blue circle is a very defensive ward that I place when I’m fearful of the enemy coming to try and dive me and/or my ADC under tower at any point in the lane. This is once again a time where the trinket ward can do wonders, since it’s usually a specific time that you’d be worried about a dive. This ward can save a spiraling lane from getting disastrous in some cases, letting you know when to back off and give up a tower rather than your lives and a tower.
Mid Game - Defensive
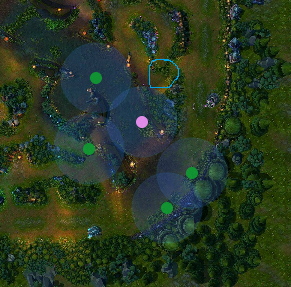
Blue Side
If after laning phase you find yourself on the defensive side and being pushed in, these should be your go to wards. You want to keep some kind of vision on dragon at all times, because this is when it is a highly-contested objective. The green wards in tri and lane bushes give you info on where the enemy is going after they push the lane up. If they keep pushing up, put up a green ward over in the bush by golems and see where they go from there.
When warding for dragon if you’re able to get the whole way around into the pit, which isn’t always possible, try and put your ward inside the overhang corner right on the inside. This keeps enemy pink wards from seeing it unless they get the pink ward inside the pit, which a lot of people don’t do. Otherwise, if you’re zoned out from the pit or think they may be trying to take dragon at the time, just toss a ward over the wall and at least get the timer on it.
The pinks are a bit situational. If you know the enemy is warding offensively in your jungle, get a pink somewhere in there. I find around mid game a lot of people put a ward on the upper bush by red buff. and in the “death bush” (The small patch in the middle of the river) by dragon (this one is a bit hard to protect though).These pinks usually spot out an enemy ward and even if they don’t, having long term vision in those areas is a great thing for your team anyway.
Red Side
Red side jungle near bottom lane just doesn't have as much to cover when you’re pushed back. That’s not to say that vision in those areas is any less important, just that it takes less wards to do the same job.
Just like with blue side you’ll still want dragon vision, and even still, you might want to do the same trick I mentioned before with putting the ward inside the pit to hide it from pinks. The nice thing here is that you’ve got access to the ramp from red side meaning you can get in and out a lot safer even if you’ve been pushed back. Getting a death bush ward is nice, but even getting a ward around the side bush is great for seeing if the enemy is moving towards dragon and it’s not checked by sweepers or pinks anywhere near as often.
If you want to try and put a pink ward further up, go for it, but realize it’s going to be a bit harder to protect since you don’t have a safe way to stay up there with towers down. The pink ward by blue buff is nice once your bottom tower dies since that’s the first objective that the enemy would look to invade and steal. If the enemy bottom lane is a lot stronger than you, they could tell their jungler that and coordinate screwing up the blue buff trade for your mid laner. That’s the correct way to transfer your power to your team’s power.
Mid Game - Offensive
Blue Side
When you’re on the offensive side of things from blue, you want to try and make use of the fact that the enemy has to take a risk by walking away from their furthest tower. Remember though, you’re further away from your tower at this point too. If you’ve got the advantage you can cover dragon and basically any avenue towards it.
Getting some sight on the enemy blue buff is a great way to push this advantage. You can turn your power bot lane into a power gain to your mid lane by taking control here and messing with the trade off. Similarly, placing some vision around the same bends as a defensive red side ward will let you know how the enemy is transitioning behind the scenes. Basically, you want to imagine yourself in your enemies shoes and think about where they’d likely walk.
Red Side
Red side is harder to take advantage of when you’re ahead in lane and get pressured. There are a lot of walls that you can’t go by without putting yourself in a dangerous situation. Even the far left ward on this map is pretty scary to do if you’re not certain on enemy positions.
If you’re ahead you should be able get vision on dragon pretty easily, especially since you’ve got the ramp like we talked about earlier. The pink in the death bush is easy to protect and a much more favorable position now as well.
Tribush and outer red buff bush wards are nice for keeping track of possible ganks or invades by the enemy jungler. Warding by wraiths is extremely useful and informative, but also risky if the enemy was walking that way or saw you go in, which is decently common, you’re caught on the way out.
Late Game - Defensive/Offensive
If you’re looking at this and wondering how the hell you’re going to ward all of this by yourself,
good. Because at this point, and even before, WARDING IS A TEAM ACTIVITY. There’s a lot to cover here and you need to cover it well because you’re trying to claw your way back into the game at this point. You need to catch the enemy making a transition when they think they’re safe. Realistically, a lot of these could be pink wards as well. I just put a few of the ones that I personally prefer.
If you can cover both dragon and baron, then go for it, but realize that those are 2 of your three wards going to objectives that at this point in the game you’re giving up especially if you don’t have vision in the routes leading to these. Baron is important to cover and a much bigger objective, so I think keeping a ward there is useful. Usually dragon gold becomes pretty insubstantial, so I would forgo it and try and just keep a timer on it.
You’ll also want to prioritize your wards on the side that the enemy is trying to push and control. There’s no point in warding the bottom part of your jungle if the enemy is focusing on shoving in your top lane and controlling baron. Don’t just blindly ward, use the knowledge you
do have to see where you need to focus your info gathering.
I consider warding late game to be one of the hardest things to do in this game, because it is a very reactive progress. At this point, your plan is pretty much as far gone as it can be in the game. Not only do you have a lot more ground to cover, but there are a lot more people with sweepers clearing out the little percentage of area you
can cover.
You also need to keep in mind that at this point you’re going to need backup if you’re going to ward anywhere that isn’t immediately close to a tower. Supports get blown up easily so walking blindly around is a great way to get killed. Make sure you
note where the enemy team is or isn't when you go into fog of war.
If you’re on the offensive side of things from red side. The only thing that changes is which sides of walls you place your wards. Your goal on that aspect is to try and extend your lead by taking what used to be safe zones from the enemy.
Probably the most important thing I could state here is to keep your vision relevant. You've only got a few wards you can place, so make them count.
Late Game - Offensive/Defensive
Pretty similar concept here. Only change is the flip of the map. You’ll be able to keep better track of dragon from this side, but baron can be a challenge if you’re on red and stuck on the defensive.
Concerning the topic of moving from offensive to defensive, it’s important to continually move your wards up with where your team is positioning. Don’t just wait until you’re sieging to try and get your vision down. A lot of times that can be too late. I always try and cover my teams flanks as we move up, especially if the enemy has someone split pushing or continually separated from their group.
When you’re going to ward objectives like baron or dragon try and ward your way to them if you’re playing from behind. If you just blindly walk over to those areas you’re sure to get jumped somewhere in between. I can’t stress enough how important the buddy system is for warding in the late game. That three minutes of vision is not worth your life!
Wrapping it All Up
I think that about covers everything. If there’s something I missed or something I didn’t go into enough detail about, please let me know. I’m always looking to learn more and debate topics in League, especially about supporting. I’m also looking for new topics to cover here. If you guys have more specific topics you’d like me to cover let me know either by commenting here, PMing me on Reddit, or messaging me on Twitter. @1000EyesLoL
Be sure to check out my other articles:
----
By Jerrod "Thousand Eyes" Steis


 Trinket - Starting out every game you’ll almost always get a warding totem. Sweeper is useful, but the cooldown on it early in the game just isn't worth trading a free refreshable ward. Unless you know your jungler is going to camp bottom early, having a warding totem for lane bush vision is extremely useful. Outside of that use, if you run out of wards early, your and your ADC can cycle your wards and keep vision out in the river constantly.